Photoshop Tutorial: 5 Ways to remove unwanted objects from your photos
One of the great things about digital photography is how easy it is to remove unwanted elements from your photos. Back in the day you’d need a craft knife and a tube of Pritt Stick, but nowadays all you need is a copy of Photoshop. Admittedly, this is more expensive than a craft knife and a tube of Pritt Stick, but it’s considerably more versatile and the chances of injuring yourself is minimal.
If you’ve got a finger across the lens, some bewildered tourists spoiling your panorama, or an ex-partner you need to purge from your pics we’re here to help. Here are 5 great ways of removing unwanted elements from your photos. We’re using Photoshop CC 2015, but all these features are present in earlier versions.
1. Brush Tool
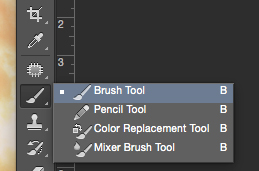
The quickest and easiest way to remove something from your image is to paint straight over it, just like in real life. Simply select the Brush Tool, sample the background colour next to it using the eyedropper tool ![]() , and plaster over it. Feels good, doesn’t it? Unfortunately, this will only really work if it’s a flat coloured background…
, and plaster over it. Feels good, doesn’t it? Unfortunately, this will only really work if it’s a flat coloured background…
![pic 2 [brush]](https://news.diginate.com/wp-content/uploads/2015/04/pic-2-brush.gif)
2. Spot Healing Brush Tool
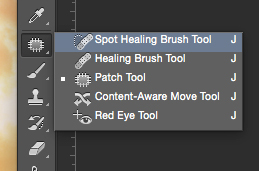
When you’ve got smaller elements and blemishes to remove, and the trusty ol’ brush tool isn’t going to cut it it’s time to bust out the Spot Healing Brush Tool. Just paint over the element you want to remove, and Photoshop will sample the colours around it and do the hard work for you. Complicated in theory, but super simple to use. Watch these unsightly rocks disappear before your very eyes, providing safe passage for fishermen everywhere…
![pic 3 [spot healing brush]](https://news.diginate.com/wp-content/uploads/2015/04/pic-3-spot-healing-brush-.gif)
3. Patch Tool
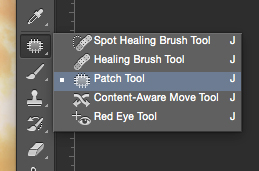
The Brush Tool and Spot Healing Tool are great functions, but offer the user limited control. If precision is the order of the day try the patch tool instead – it allows you to create a selection and then drag it over a spot which would better suit the element you want to banish. All patched up and ready to go (onto facebook)…
![pic 5.1 [patch tool - source]](https://news.diginate.com/wp-content/uploads/2015/04/pic-5.1-patch-tool-source.gif)
This tool works also the other way around, meaning you can create a selection of an area you like and then drag it over the unwanted spot. Switch to “destination” in the option bar to do this. You can create the selection either with the patch tool itself or use any other selection tool of your choice.
![pic 5.1 [patch tool - destination]](https://news.diginate.com/wp-content/uploads/2015/04/pic-5.1-patch-tool-destination.gif)
4. Clone Stamp Tool
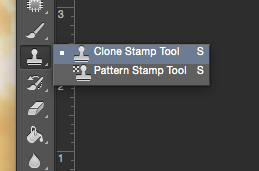
The Clone Stamp Tool is an invaluable function for retouchers the world over. It’s a touch trickier to use, but once you master it a whole world of photo manipulation is at your fingertips. The principle is simple: (ALT)+click on an area you would like to copy and then paint over the areas to hide. Every now and then you will need to resample the source area to keep things natural looking.
![pic 6 [stamp tool]](https://news.diginate.com/wp-content/uploads/2015/04/pic-6-stamp-tool.gif)
5. Content Aware Fill

This is another one where Photoshop does the work for you – just use one of Photoshop’s selection tools (we’re using the lasso) to select the item you want to get rid of, hit EDIT>Fill and choose ‘Content Aware’. Photoshop will look at the image, figure out what should have been there, and fill in the gaps for you. This tool is also great if you need to, for example, extend an image a little or add bleed.

So there you have it – 5 ways to remove unwanted elements from your images. Go forth and blur the line between fact and fiction!
![pic-7-[final]](https://news.diginate.com/wp-content/uploads/2015/04/pic-7-final1.jpg)